Import / Export for Mobile
Use files in your Mobile App development workflows
Within the Localize dashboard, we provide you with the ability to import and export phrases and translations in various file formats.
You can also import/export Glossary terms.
To import or export simply go to the File Import / Export page in your dashboard.
Below you will find basic instructions for importing/exporting any of the supported file types for Mobile projects.
Supported File Formats
For details on the requirements for the various file formats supported in mobile projects, select a file format below to view our developer docs for that format.
- Android XML
- CSV
- gettext PO
- Google Flutter ARB
- iOS Strings
- iOS Stringsdict
- JSON
- RESX
- Simple JSON
- XAMARIN RESX
- XML
- YAML
UTF-8 Character Encoding
Be sure that you are using the UTF-8 character encoding when working with the external files you are creating for importing purposes, so that special characters like accents are encoded properly.
Importing your source language phrases into the Localize platform and translation workflow allows you to invite your translators to add/edit translations or to order professional translations from one of our third-party providers directly through our platform. You can also import phrases and translations that were done outside of Localize.
Before importing, ensure your file adheres to the file requirements for the file type you are importing. You can find these requirements on the page for that file format.
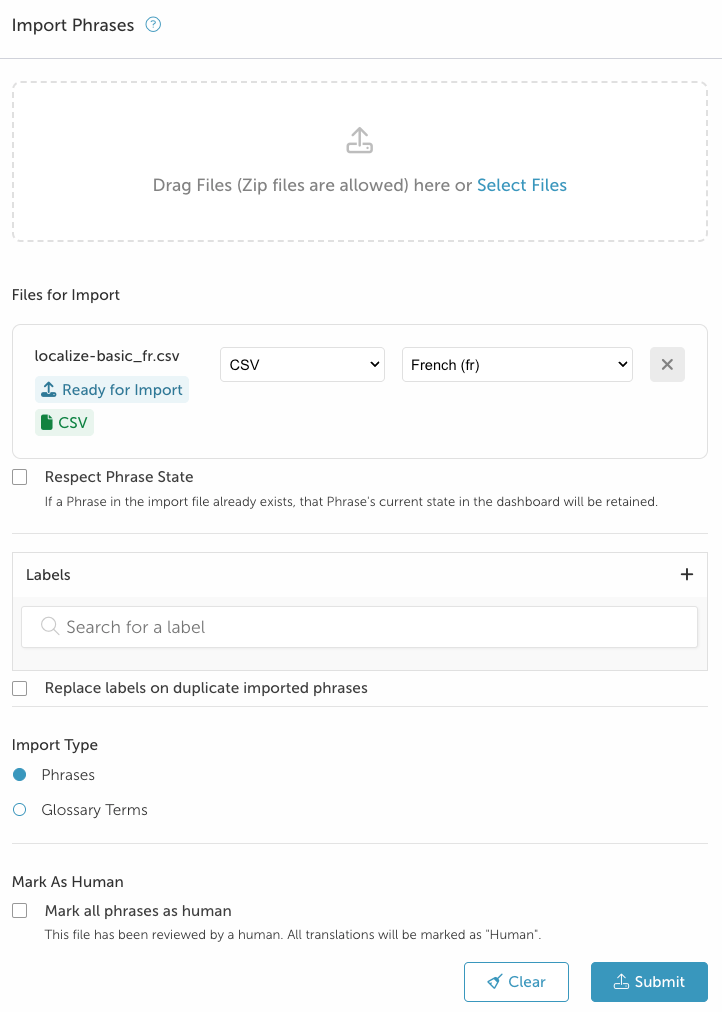
Navigate to the File Import / Export: Import tab in your dashboard.
Sample Files
You can download a sample file of the format of choice by clicking on its icon and then clicking the Download Sample button. Use this as a guide for creating your import files.
-
Drag-and-drop a file to import into the box, or select a file to import (or use Google Drive).
- If you have multiple files to import, repeat.
- You can also import a ZIP file that contains multiple import files.
-
The file type will be auto-detected and displayed.
- If it's incorrect, select the appropriate format from the drop-down.
- Repeat this for each file you are importing.
-
The language will be auto-detected and displayed.
-
If it's incorrect, select the appropriate language.
-
Repeat this for each file you are importing.
-
-
Select the Respect Phrase State checkbox if you want existing phrases to retain their current state in the dashboard (e.g., existing phrases in the Blocked bin won't be moved to the Published bin).
-
You can add any Labels to the phrase by selecting one or more from the list or creating a new one by clicking the plus button.
-
Select the Replace labels on duplicate imported phrases checkbox if you want new labels to replace the old ones on an existing phrase.
-
- When not checked, the new labels are added to any existing ones.
-
-
Specify the import type: Phrases or Glossary terms
-
Select the Mark all phrases as human checkbox if a human has reviewed all phrases.
-
Click the Submit button.
-
Wait for the file(s) to be uploaded.
-
Success! View the file details to see how many phrases were created, updated, etc.

If there are any errors during the import process you will be notified with a message describing the error.
All phrases in the import file will be categorized as follows:
- Created
- A new phrase was created.
- Updated
- An existing phrase was updated.
- Unchanged
- The source phrase and translation matched the existing content so no action was taken.
- Ignored
- No phrase was found for the given phraseKey when importing a target language file.
- The phrase is new but it does not have a value to match the phraseKey.
Results of Importing Translations
When you import translations, your Localize library gets updated:
- Existing translations will be overwritten
- New translations will be added from the file that you upload
- by default, phrases will have the Import tag applied
- If you opt to select the Mark all phrases as human reviewed. checkbox, then the phrases will be marked with your name, indicating that those phrases were marked as human.
Destination After Import
- If you are using the Translation QA Workflow, then your imported phrases will be automatically moved to one of the Translation QA bins, either Needs Review or Needs Translation.
- If you are NOT using the Translation QA Workflow, then your imported phrases will be automatically moved to the Published bin, whether they have translations or not.
Phrase Keys Displayed with Phrases
After importing a source language file, Localize will show the phrase Key along with the phrase in the Localize dashboard.
Import with Pluralized Phrases
Note, if a phrase is pluralized, then it will have multiple translations for a single source phrase. Unless otherwise noted in a specific file format, all translations will be imported together, separated by 4 vertical bars ||||.
Source phrase:
Your trial ends in <var count=""></var> days
Translation:
Su prueba termina en <var count=""></var> día||||Su prueba termina en <var count=""></var> días
Import History
After your import has been completed, you can view the status under Import History.
- If your import is successful, you can click View to see:
- How many phrases were created/updated/unchanged/ignored
- Language
- File format
- If your import fails, click Review Error to see details about the error.

Exporting Files
You can export your translations for backup purposes, send them to your translators (who can translate your content using a third-party tool), or delegate the translation process to a translation service of your choice.
Navigate to the File Import / Export: Export tab in your dashboard.
- Specify the export type: Phrases or Glossary terms
- Select the desired file type under File Format.
- Select a filter that will determine which phrases get exported:
- If using the Translation QA Workflow:
a. Published translations
b. AI translations
c. Human translations
d. No translations
e. Needs human translations
f. Translations that need review
g. Phrases that need translations
h. Phrases with rejected translations - If not using the Translation QA Workflow:
a. Published translations
b. AI translations
c. Human translations
d. No translations
e. Needs human translations
- If using the Translation QA Workflow:
- Select the language(s) you are exporting.
- If you select multiple languages, a separate file will be downloaded for each selected language.
- See the note below: Exporting Multiple Files Simultaneously
- Select the destination drive to which you would like to export your file(s).
- Desktop
- Google Drive
- Click the Export button.
- Wait for your download to complete, then close the popup dialog.
- If you selected Google Drive as your destination above:
- If this is your first time using Google Drive in your Localize dashboard you'll be asked to connect with your Google Drive account.
- Otherwise, you'll be asked if you want to save the file(s) in your main drive or in a specific folder.
Exporting Multiple Files Simultaneously
If you choose to export multiple files in a single export, a separate file will be downloaded for each chosen language. For security purposes, some browsers will not allow this and will only download 1 file. To enable multi-file downloads, follow these instructions:
Google Chrome:
- Bring up Settings in the browser.
- Select Privacy and security.
- In the Content section select Pop-ups and redirects.
- In the Allowed to send pop-ups and use redirects section click Add.
- Enter app.localizejs.com and click Add.
Microsoft Edge:
- Bring up Settings in the browser.
- Select Cookies and site permissions.
- Select Pop-ups and redirects.
- In the Allow section click the Add button.
- Enter app.localizejs.com and click Add.
Export with Pluralized Phrases
Note, if a phrase is pluralized, then it will have multiple translations for a single source phrase. Unless otherwise noted in a specific file format, all translations will be exported together, separated by 4 vertical bars ||||.
Translators working in the exported file will need to be made aware of, and maintain these separating bars.
Source phrase:
Your trial ends in <var count=""></var> days
Translation:
Su prueba termina en <var count=""></var> día||||Su prueba termina en <var count=""></var> días
Exporting Selected Phrases
When on the Phrases page in the Localize dashboard, you can utilize all of the powerful filtering capabilities available to create a custom list of phrases to export to a file.
Simply select which phrases you want to export, click the Export button, select a file format, name the file and you're done! See the examples below for more details.
Select Language First
Any export from the Phrases page will export phrases in the currently selected language.
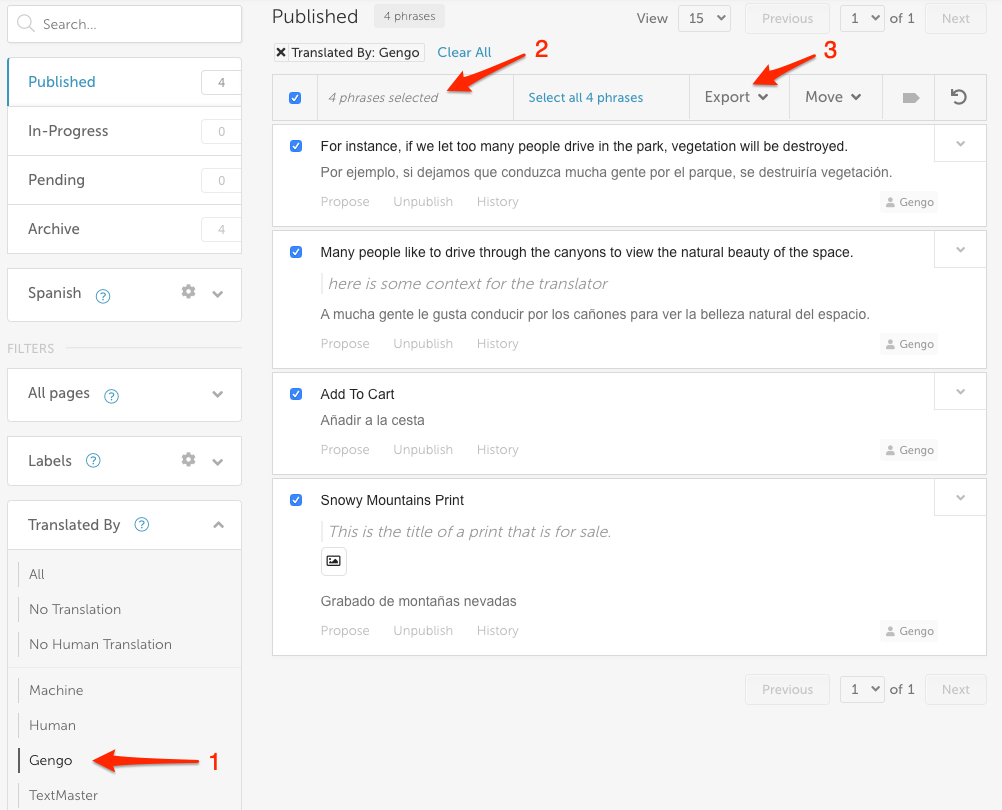
Example Use Case: Exporting Gengo Translations
In this example, we are exporting phrases that have been translated by Gengo, one of our translation partners.
Steps in the exporting process:
- Select the desired filter from the Translated by list, in this case: Gengo
- Click the Select all phrases on this page checkbox
- Click the Export button
- Select a file format from the drop-down list.
- Provide a name for the exported file, and select a location to save the file.
Updated about 1 month ago