Widget Customization
The widget allows your visitors to select their preferred language when visiting your website.
Customize Widget Page
Visit the Widget page to customize the language selection widget. This will display the Widget settings page.

Admin Permissions Required
To edit the widget settings you will need to have Admin permissions for the project.
Display

Displaying the language widget on your website
By default the Localize language widget is shown on your site, allowing users to select their desired language with which to view your site.
Hiding the language widget on your website
To hide the default widget, unselect the Display language widget on your website checkbox, then click Save Changes.
Hiding the widget on certain pages
- To hide the widget on some pages and show it on others, use the
disableWidgetoption when calling the Localize.initialize() function in the frontend API. You will need to write Javascript code to accomplish this. See the following code sample, and replace PAGE_NAME_HERE with the page name on which you want to hide the widget.
var hideWidget = (window.location.href.indexOf("PAGE_NAME_HERE") > -1) ? true : false;

Localize.initialize({
  key: '[[app:key]]',
  rememberLanguage: true,
  disableWidget: hideWidget,
});
Display "O" symbol on widget
By default the Localize "O" symbol is displayed on the widget. This can be toggled off in some Localize subscription plans, effectively white-labeling the widget.
- To hide the Localize "O" symbol, unselect this checkbox, then click Save Changes.
Display "Powered by Localize" on widget
By default "Powered by Localize" is displayed on the widget. This can be toggled off in some Localize subscription plans, effectively white-labeling the widget.
- To hide "Powered by Localize", unselect this checkbox, then click Save Changes.
Positioning
You can position the widget in one of 6 places on your site.
- Select one of the 6 positions, then click Save Changes.
- You can also use the Disable Fixed Positioning option.
- When fixed positioning is disabled (selected), the widget will position itself at the bottom of your page.
- You can select either bottom-left or bottom-right placement for the widget.
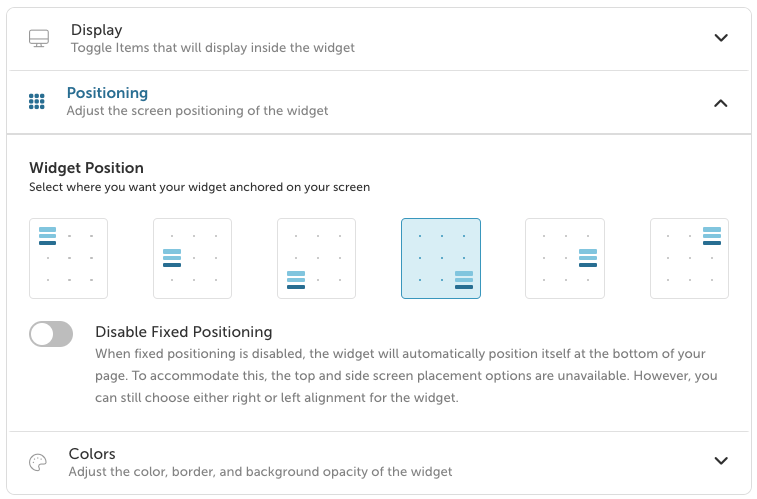
Colors
We provide two default themes (dark and light) and the option to customize the theme to your liking to match your brand.
- You can add a border to the widget.
- You can set the widget's background opacity.
- You can select custom colors using the color picker.
- Select your desired options, then click Save Changes.

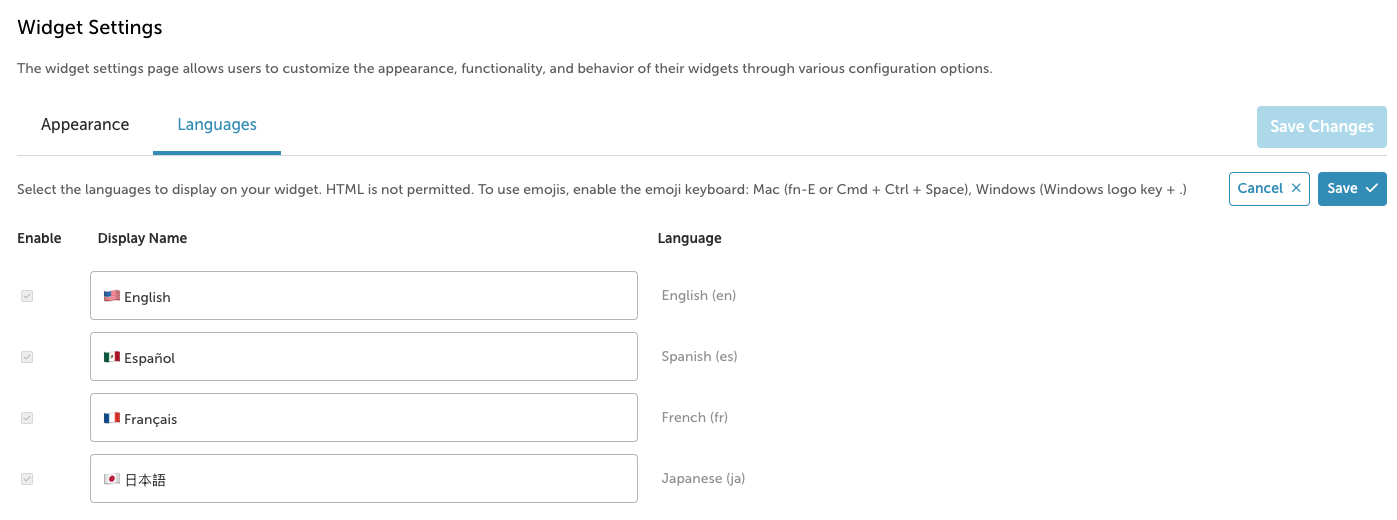
Languages
You can select which languages to display on your widget.
- Select/deselect the checkbox next to a language, then click Save Changes.

Hiding a Language
Hiding a language is useful, especially when adding a new language to your Project while you are working on the translations for the new language. Then, when your translations are completed, you can add the new language back to the widget so users can select it.
If you want to preview the site as translations are being added, you can either:
1. Use the On-Page Editor
2. Change the language on the query string using the ljs parameter:
ljs parameter:www.example.com/?ljs=es, where 'es' is the language code for Spanish.
3. Use the Developer Tools in your Browser
- Enable the Developer Tools in your browser.
- In Chrome, Firefox or Safari, you can press:
- Command+Option+C (Mac)
- Control+Shift+C (Windows, Linux, Chrome OS)
- This will display the Developer Tools window.
- In the Developer Tools window, select the Console tab.
- In the console area, enter the following JavaScript command to switch the language:
Localize.setLanguage('ko');
Replace 'ko' with the appropriate language identifier, as seen on the Project Overview page.
Changing the Language Display Names
You can change the language names as they appear on the widget, including the project source language.

Instructions:
- Select the Languages tab.
- Click the Edit Display Names button.
- Click on the name of the language that you'd like to change.
- Click Save Changes when you are ready.
- Bring up your site and view the widget.
- Refresh the page, and you'll see the new name in your widget!
Adding Flag Icons for your Language Display Names
You can use emoji flags with your Language Display Names to include a flag icon with the language switcher. This can help users more quickly select the matching language as well as notice the language switching widget.
Instructions:
- Select the Languages tab.
- Click the Edit Display Names button.
- Click on the name of the language that you'd like to change.
- Show the Native Emoji keyboard to find and insert the flag emoji. You can press :
- fn-E or Cmd + Ctrl + Space (Mac)
- Windows logo key + . (Windows)
- Make your changes.
- Click Save Changes when you are ready.
- Bring up your site and view the widget.
- Refresh the page and you'll see the new name in your widget!
Customize Which Languages are Available
You can programmatically determine which languages are available by providing an array of language codes in your Localize.intialize() call. Read about the enabledLanguages option here.
Custom CSS
Style the widget to match the colors and style of your website by manually adding custom styles to your language widget. The widget will accept any CSS override styling on your own website.
- Add a
<style>tag to the<head>element of your web page (or include in a separate CSS file) - Any CSS style overrides should use the following selectors:
<div id="localize-widget" class="localize-left-bottom"></div>
<div id="localize-current"></div>
<div id="localize-widget-langs"></div>
<div id="localize-powered-by"></div>
<div id="localize-active-lang"></div>
<div id="localize-widget-langs"></div>
For positioning of the widget, use the following Class selectors:
class="localize-left-bottom"
class="localize-right-bottom"
class="localize-left-center"
class="localize-right-center"
class="localize-left-top"
class="localize-right-top"
!important
In some cases you may need to add the !important attribute to your custom CSS rules.
For example, if you select the top/right position for the widget but you want to move it a bit to the left and down some, you could use the following custom CSS in your page:
#localize-widget {
  right: 140px !important;
  top: 10px !important;
}
Feedback Option in the Widget
You can gather feedback on the quality of the translations on your website from your end users by enabling the Feedback button on your widget. Read how to use this feature in the Feedback Option in the Widget help doc.
You can also enable this option in your custom widget. Read here for more details.
Build-your-own Widget
Don't like the default Localize language-switching widget? Build your own! Read how to create a Custom Language Switcher to fit within your native dropdown (anywhere on your site).
Updated 8 months ago