Quickstart for Emails
Translate your emails with Localize
Getting started with Localize For Emails is simple and shouldn't take more than a few minutes. If you haven't already, follow the instructions for Signing Up and create your first Email project.
Step 1: Create an Email Project
To get started with Localize For Emails:
- Create a new project and select the Emails project type.
- On the Project Overview page, click on All Emails from the Quick Links panel.
- Click Upload your first Email when you are ready.
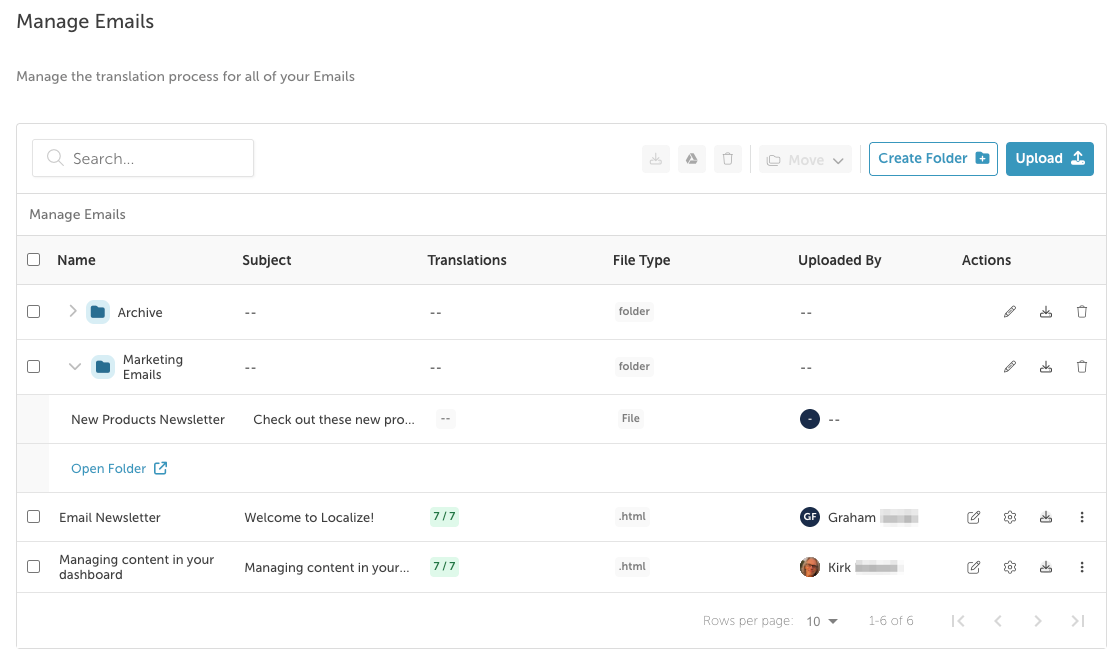
Step 2: Add the Source Content
- On the Manage Emails page, click the Upload your first Email button (or the Upload button).
- Enter the Name and Subject of the email in your source language.
- Enter the HTML content of the email by doing one of the following:
a. Paste the HTML of the email into the box.
b. Upload the HTML by clicking and dragging a file into the box or browsing for a file to upload. - Click Translate Email
- The email will be added to your Email Library.
Step 3: Translate your Email
There are several ways to add translations to your emails.
- Click on an Email in the list.
- This will display the Translations panel for the email.
- Select one of the translation options below.
Translation Options:
- Use the Email Editor:
- To create or edit your translations directly in the dashboard, click on the
 language icon.
- This will display the source and target language versions of the email side by side, for easy editing.
-
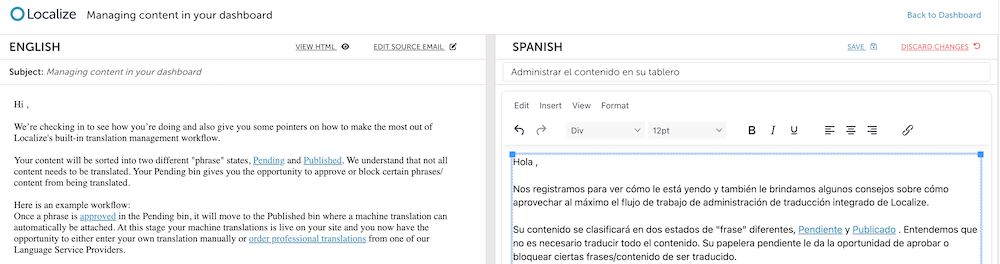
- Click the Edit Translation button.
- Make your edits, then click Save.
- When done, click Back to Dashboard to return to your Email Library.
- Other Options
- You can view the HTML of the email by clicking the View HTML button.
- You can download an HTML file for the translated version of your email by clicking the Download HTML button.
- To create or edit your translations directly in the dashboard, click on the
- Upload Translations:
- To upload a file with your translations, click on the
 replace icon.
 - Select the file to upload.
- Confirm that you want to overwrite any existing translations, if applicable.
- To upload a file with your translations, click on the
- Order AI Translations:
- Select the checkbox for the email.
- Click the Translate button.
- Select AI Translation, and click Continue.
- Translations will be generated, and an indication will be visible on the screen when completed.
- Order Human Translations from one of our LSPs:
- Select the checkbox for the email.
- Click the Translate button.
- Select Human Translation, and click Continue.
- You will be brought to the Orders page, where you can complete your order.
Download All Files for an Email
You can download the source language file along with all active translations of the email when in your emails list.
- Click on the email in the list that you'd like to download.
- Click the
 Download button
 - Your files will be compressed into a Zip file.
- You will receive an email with a Download files link.
- Click the Download files link and select a location to save the files.
What's Next
Read in more detail how to manage your Emails.
Updated 7 months ago